Cargo is the out of the box Tool in Rust Programming Language
which can be used by Rust Developers or as they like to call themselves Rustaceans to
- Create Their Rust Projects
- Manage Packages / Crates i.e. Project Dependencies from Crates.io
- Build Compiled Distributable Packages
- And Upload Their Open Source Packages / Crates to Crates.io
if they want to do so.
In this Article, we will be taking about Rust Programming Language to understand
- Difference between a Binary and Library Project in Rust Programming Language
- Folder Structure for Projects in Rust Programming Language
- Creating a Rust Project using Cargo from your Terminal
- And A List of Commonly used Cargo Commands
that you will use frequently when developing your Projects in Rust Programming Language.
So, without further ado, let’s get started!
This Article is part of Minimalist Text Editor Using Rust and Tauri Tutorial Series
- Setting Up The Development Environment for Rust Programming Language
- Creating The Rust Project Using Cargo and Understanding Rust Project Folder Structure <— You’re Currently Here :p
- Tauri and Reasons For Using It in Our Rust based Minimalist Text Editor
- Understanding Tauri Multi-Process Architecture, Core Process & WebView Process
- Understanding Tauri Inter-Process Communication (IPC) | Events & Commands
- What is Isolation Pattern in Tauri and Why you should be using it
- Security Features and Practices to understand when Developing Applications using Tauri
Difference between a Binary and Library Project in Rust Programming Language
Before getting into coding your projects in Rust,
you need to understand the Basic Project Folder Structure of a Rust Project.
And before doing that, you need to understand the difference between a Binary Rust Project and a Library Rust Project.
A Binary Project in Rust is one which will be compiled and an executable file will be created
based on the platform that you are targeting like Windows, Linux, Mac or other Embedded Systems.
All Binary Projects need to have an main.rs file which will be the entry point to your software.
On the other hand, A Library Project in Rust is one which does not create an executable file
and instead it is just a code base meant to introduce new functionality and be reused across various other Rust Projects.
This could be something like – a Math Library or a GUI Library like egui in Rust.
A Library Project has a lib.rs file instead of a main.rs file and cannot run on it’s own.
With that clearly explained, let’s move on and understand the Rust Project Folder Structure
Folder Structure for Projects in Rust Programming Language
The Folder Structure of a Rust Project is actually really simple.
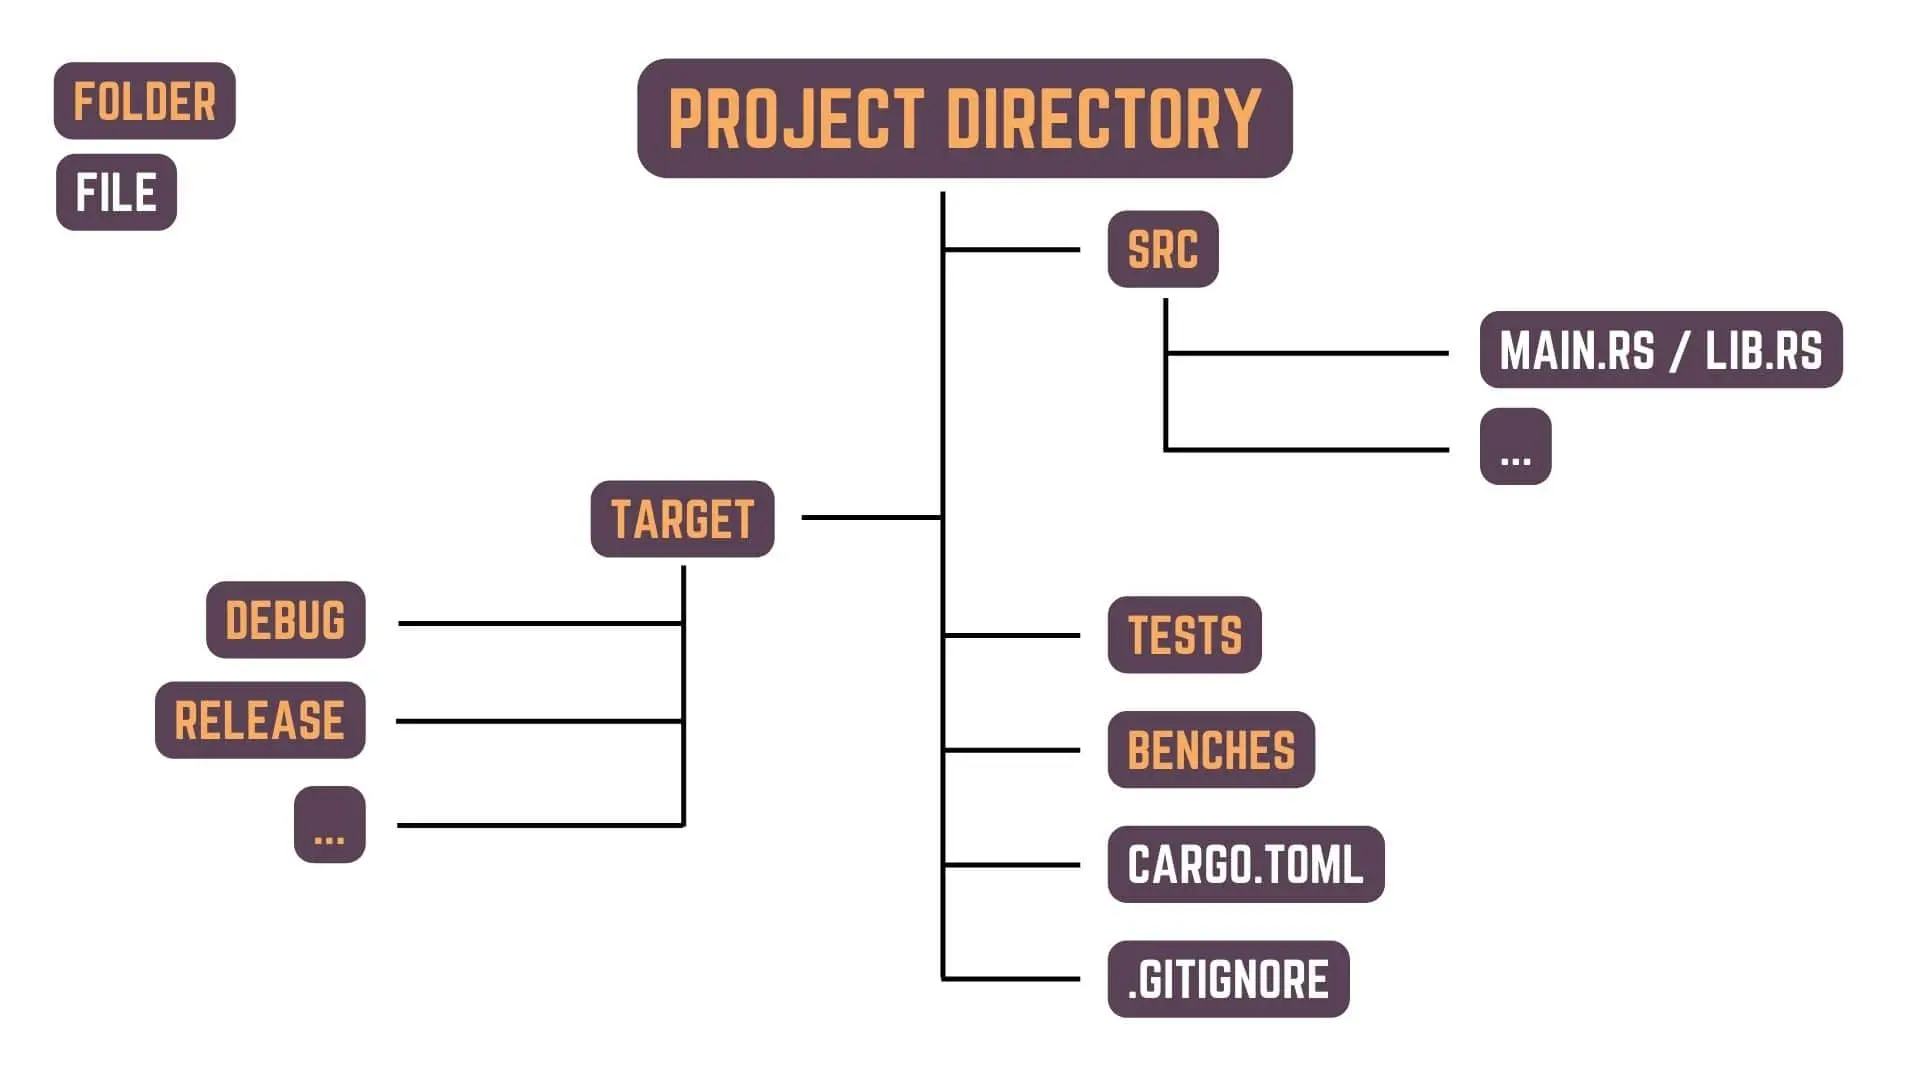
As you can see in the image above, there are two important files in a Rust Project
- main.rs / lib.rs
- Cargo.toml
the main.rs or lib.rs file is where you will write the code for you rust application
and the Cargo.toml file is where you will manage your project details like
- Name
- Version
- Authors
- Edition
- Dependencies
- and other such settings.
If you want to use a VCS (Version Control System) like git, you can also create a .gitignore file alongside with Cargo.toml
To make everything organized, the main.rs or lib.rs file is usually kept inside src directory along with your other Source Code.
You can make other directories like
- tests – For storing all the Automated Tests for your Rust Project
- benches – For storing all the Benchmarks for your Rust Project
- examples – For storing implementation examples. Ex. Code usage example for people using your library.
Other than that, when you will create a build for your project,
a target directory with other subdirectories like debug or release will also be created
to store the created build and other files.
For now, I won’t go into more details about tests, benches, examples and target directory
as otherwise you will get overwhelmed with the sheer amount of information.
Creating a Binary and Library Project for Rust Programming Language with Cargo using your Terminal
Now, you can create all these files and directories one by one but it can be extremely cumbersome to do so.
The Rust Language Developers also seem to completely agree with this sentiment,
which is why they have provided us with an Awesome Tool like Cargo.
So, let’s take a more closer look at how we can use Cargo to Create, Manage and Build your Rust Projects
Cargo is a CLI i.e. Command Line Interface Tool which can be used through the Terminal.
I’m using Windows as my Operating System, so i’ll be using CMD as the Terminal.
Creating a new Rust Binary Project using Cargo
To create a new Rust Binary Project using Cargo, just go to the Terminal
and type the command below
cargo new your_project_nameMake sure your Project Name is in Snake Case i.e. no capital letters or spaces
because otherwise you will get a Warning while building your Rust Project.
By Default, using the command above will also creates a .gitignore file for git, if we are not already in a VCS Repository.
To create a Rust Project without VCS, you can use the command below
cargo new your_project_name --vcs noneCreating a new Rust Library Project using Cargo
For creating a Rust Library Project instead,
you just need to add –lib flag to either command like shown below
cargo new your_project_name --libcargo new your_project_name --vcs none --libWith these commands, Cargo will create the appropriate directory and files for you
and then from the next article we can start coding our Minimalist Text Editor in Rust Programming Language.
Now, let’s move on the final section of this article
and look at the other Cargo Command that we will be frequently using during Rust Development.
Commonly used Cargo Commands in Rust Development
This is not a complete list of all the commands available when using Cargo for that please visit The Cargo Book.
Some of these Cargo Commands need to be used inside your project directory.
If you want to see what [options] are available for each command
click on the command to take you to the Official Rust Documentation.
cargo search [options] [query]
Search queried package on crates.io repository
cargo update [options]
Update dependencies as recorded in the local lock file
cargo build [options]
Compile Package and it’s Dependencies.
cargo check [options]
Check a local package and all of its dependencies for errors without performing code generation.
Is used because using cargo check will be faster than using cargo build.
cargo clean [options]
Remove artifacts in the target directory that Cargo has generated in the past.
When no options are used, it will remove the complete target directory.
cargo doc [options]
Build the documentation for the local package and all dependencies. The output is placed in target -> doc Sub Directory.
cargo rustdoc [options]
Build a package’s documentation, using specified custom flags.
cargo fix [options]
Automatically fix lint warnings reported by rustc.
cargo run [options]
Build and Runs a binary or example of the local package.
cargo rustc [options]
Compile a package, and pass extra options to the compiler.
cargo test [options]
Compiles and Executes Unit and Integration tests.
cargo bench [options]
Compile and Execute Benchmarks.
This Article is part of Minimalist Text Editor Using Rust and Tauri Tutorial Series
- Setting Up The Development Environment for Rust Programming Language
- Creating The Rust Project Using Cargo and Understanding Rust Project Folder Structure <— You’re Currently Here :p
- Tauri and Reasons For Using It in Our Rust based Minimalist Text Editor
- Understanding Tauri Multi-Process Architecture, Core Process & WebView Process
- Understanding Tauri Inter-Process Communication (IPC) | Events & Commands
- What is Isolation Pattern in Tauri and Why you should be using it
- Security Features and Practices to understand when Developing Applications using Tauri
Conclusion
Well Folks! That does it for this article.
I hope that you found this information on Cargo and Rust Project Folder Structure useful.
In the next article, we will start working on the code for our Minimalist Text Editor in Rust Programming Language and Tauri.
May you have success in your career whatever it may be.
See you again in the upcoming articles!
Share this post on Social Media platforms, if you think our content is great.
If you like the content and would like to follow us, we are present on the platforms below
Follow Us On Social Media
Goodbye For Now,
This is your host VP
Signing Off.
Articles On Minimalist Text Editor Using Rust Programming Language And Tauri
Setting Up The Development Environment for Rust Programming Language
Creating The Rust Project Using Cargo and Understanding Rust Project Folder Structure
Tauri and Reasons For Using It in Our Rust based Minimalist Text Editor
Understanding Tauri Multi-Process Architecture, Core Process & WebView Process
Understanding Tauri Inter-Process Communication (IPC) | Events & Commands
What is Isolation Pattern in Tauri and Why you should be using it
Security Features and Practices to understand when Developing Applications using Tauri
