Methods can be considered as the one of the building blocks of Programming
and are used to write your program’s code in small manageable blocks instead of a huge monolithic script.
I’ve divided my explanation of Methods in 4 different articles as otherwise the articles would be too long.
List Of All Articles To Master Methods In C#
- Part 1 – Basics Of Methods <— Currently You Are Here! :p
- Part 2 – Multiple, Required and Optional Parameter + Named Arguments
- Part 3 – Overload Resolution
- Part 4 – In, Out and Ref Keywords
In this article, I’ll will be covering all the basics things regarding Methods in C#, like
- What is a Method?
- How to define Methods in C#? i.e. The Syntax to define Methods in C#
- Understanding the thought process behind how to divide your code into Methods
- A Simple Code Example for Defining a Method based on an RPG Analogy
- A Code Example To Define Method With Parameters building on the same RPG Analogy
and in the subsequent articles, I’ll be be going into more details about it.
So, without further ado, let’s dive directly into it!
This Post is Part of : How To Make A Game Series where I’ll be showing you how to become a game developer and will be going over the basics of Game Development, Step by Step, using the Unity Game Engine and C# Scripting Language to script the Game Logic.
If you are new to Game Development or Programming in general you should definitely go through this Unity Tutorials article series as it will set give you a kick-start towards becoming an exceptional Unity 2D or 3D Video Game Developer.
Designing and Developing your games on a Low End / Low Spec PC can be a hellish experience which makes you want to bash your head through a wall.
So to ease your Game Development experience, I’ve written this article on 5 Ways To Develop Games On Low End / Low Spec PCs with Unity
in which I’ve given 5 Actionable Points that you can do with relative ease, to improve your Game Development experience with Unity by miles.
What is A Method? | Unity C# Game Development Tutorial
We have already been in contact with Methods since the article about Variables & Data Types
in which i over-viewed the structure of a C# Script
and since then all the code that we have typed has been part of a Method
whether it be the Start Method or the Update Method.
Now you can consider a Method as a block of code that will only be executed if it is called by your program.
This also means that if you have structured your code into methods
instead of just dumping it like we have been doing so far,
then we can reuse the same code again and again in multiple places
without having to type it multiple times or copying and pasting it in multiple locations.
This will also make your code much more manageable
as there will be tons of places where you will be reusing code blocks
that you have decided to structure into a method.
So to reaffirm, what I’m saying is
Methods are self contained blocks of code that perform a certain task
and they allow you to reuse the block of code in your program as you see fit.
Syntax To Define Methods in C# | Unity Game Development Tutorial
Now let’s go over the Syntax for creating a Method.
// Everything below is inside a Class.
// The code below is just to understand the Syntax.
// For working example move further down in the Article.

<Optional Access & Type Modifiers> <Return Type> <Method Name>(<Optional Parameters>)
{
  // Code Block
  return <Value or Variable of Return Type>;
}
The Syntax can be divided into 5 sections.
C# Methods Syntax | Section 1 – Optional Access & Type Modifiers
First section, is the optional Access and Type Modifier keywords
Here you can type an access modifier to define the scope of the method
and after that add type modifiers like static or abstract when you need them.
But for now it’s not important, so don’t think about that.
I know i have not yet talked about how access modifiers work
but i did not want to go on a tangent and move away from the main topic
so, i have various article lined up about the Access Modifiers, Type Modifiers and important Keywords in C#
which I’ll be uploading really soon and will link below, so look out of that.
Article Links
- I’ll link the articles when i upload them :p
C# Methods Syntax | Section 2 – Method Return Type
Next is the Return Type for the Method
which is you stating that, after the code block inside the method is executed
what kind of data are you sending back to the the line from which this method was called.
This Return Type can be a Value or Variable of any Data Type in C#.
it can also be an Array, a Collection or an Object of any kind.
C# Methods Syntax | Section 3 – Method Name And The 2 Parenthesis
After that we have the Name of the Method and the two Opening and Closing Parenthesis
which tells the compiler that you are writing a Method.
C# Methods Syntax | Section 4 – Parameters For The Method
Next, Inside the two Opening and Closing Parenthesis,
you can either not type anything
or you can type one or more Parameters
that you think you will need
for the code block inside the curly braces to work correctly.
if you write a method with a parameter inside it, you are basically saying that
you’ll be passing a data of x datatype with name y
when you call this method from anywhere.
If you have stated when defining the method that you need two parameters
then you need to fulfill those two parameters with an argument each
when and where this method is called.
C# Methods Syntax | Section 5 – Code Block & The Return Statement
and finally the last section is the Code Block and the Return Statement that will be typed inside it.
This Return Statement is you returning back a Value or Variable of the defined Return Type of this method
to the line from which this method was called.
that is if you set the Return Type to string array
then you will be sending back a string array
Another point i need to mention is that,
if you want to make a method that will return nothing
then you can use void keyword as the Return Type of that method.
I know that some of you might be getting a bit confused right about now
but just stick around and i assure you that before this article ends
you will have a thorough understanding about the basics of methods in C#.
Understanding Methods Using RPG Analogy | Unity Game Development Tutorial
Now let’s go to the RPG analogy, so that i can give you some context
about how you should think about methods when you are developing a game.
Think about the main character in your game and the various actions he/she can perform in your game, like
- Running
- Jumping
- Attacking using different weapons,
- Talking to NPCs
- Climbing Buildings
- Diving Underwater
- Driving a Vehicle and what not.
All these actions are something that are pretty common in an Open World RPG
and what we can do when we are coding these actions
is to divide it’s execution into one or more methods.
So, let’s say that we are writing a script named playerMovement
which will allow the player to control the main character.
Now this script will contain all the methods that we will create
that facilitate the movement of our main character in the 2D or 3D world, like
A Method that will set the Default Values for the Necessary Variables.
Another method that will contain the code to change the Transform and Rotation of the main character in the 2D or 3D world
when the player is moving the Joystick or pressing WASD Keys on the Keyboard
or maybe if it’s a click to move sort of game, then the method will register the Mouse Clicks.
then, we have another method to toggle between Crouching, Walking and Running
when certain keys or combination of keys are pressed.
After that various methods, which will allow the main character to Jump, Double Jump, and Roll.
You will also have methods that will help you control your state machines
for animating your main character’s Walk Cycle, Jumping Animations and Rolling Animations
and all those things.
Now, how you are structuring these methods to get the desired outcome is on you the programmer to decide.
i.e. whether you have separate methods for each action
or in some way you are bundling a couple of them in the same method
As you keep on working with Unity,
you will slowly train your senses about which of the two you should be selecting
based on what you are trying to accomplish.
Defining a Simple Methods in C# | Code Example | Unity Game Development Tutorial
Declaring Variables and Defining your First Methods in C# & Unity
With that, let’s move on from coding playerMovement
and think about the Dialogue System in your game.
Now lets code a method, that will allow your Player to go to a NPC
and press X on the keyboard to start a dialogue.
To do this, what we need to do first is
declare a variable named _withinRange and set it to true.
After that we will declare our Method named startDailogue
with Access Modifier set to Public and Return Type set to Void.
and then inside the curly braces we will Debug.Log
“NPC Says : The demons are attacking the north gate.”
// Everything below is inside a Class.

private bool _withinRange = true;

public void startDialogue()
{
  Debug.Log("NPC Says : The demons are attacking the north gate.");
}
Now with that, we have successfully created a method
that will not return anything and does not have any parameters defined for it.
Checking For Player Input Using The Update Method
So what we need to do next is go to the Update Method
and create an if statement with a compound condition
with the first condition being
Input.GetKeyDown(KeyCode.X)
after that we have the Logical AND operator
and then the second condition being
_withinRange == true
What this will do is based on where you have written this code
if the compound condition returns true
then, on the frame that you will press X on the keyboard
it will execute the code block inside the curly braces.
Now inside the curly braces of the if condition
let’s make a call to our method by typing startDialogue(), like this
// Everything below is inside a Class.

private bool _withinRange = true;

void Update()
{
  if(Input.GetKeyDown(KeyCode.X) && _withinRange == true)
  {
    startDialogue();
  }
}

public void startDialogue()
{
  Debug.Log("NPC Says : The demons are attacking the north gate.");
}
and that’s it.
With that we have created a method and called it inside the Update Method.
Now there is a reason why we are using the Update Method, instead of the Start Method here
and it is because Everything Within the Update Method is executed every single frame of your game
and you want to get your player input without any delay and as many times as you can
Putting this code in the Update Methods means that
if your game is running at 30 fps then update will be executed 30 times
while if your game is running at a 100fps then it will be called a 100 times.
Now, let’s execute this piece of code in unity and check the logs
Just A Small Tangent :p
This is also the reason why you should never do physics calculation in the Update Method and instead use FixedUpdate Method
as the fps keeps on varying based on how fast your graphics card is pumping out frames when you game is running
and you don’t want your physics calculations to be off because of that.
Simple Method In C# | Code Example | Unity Log
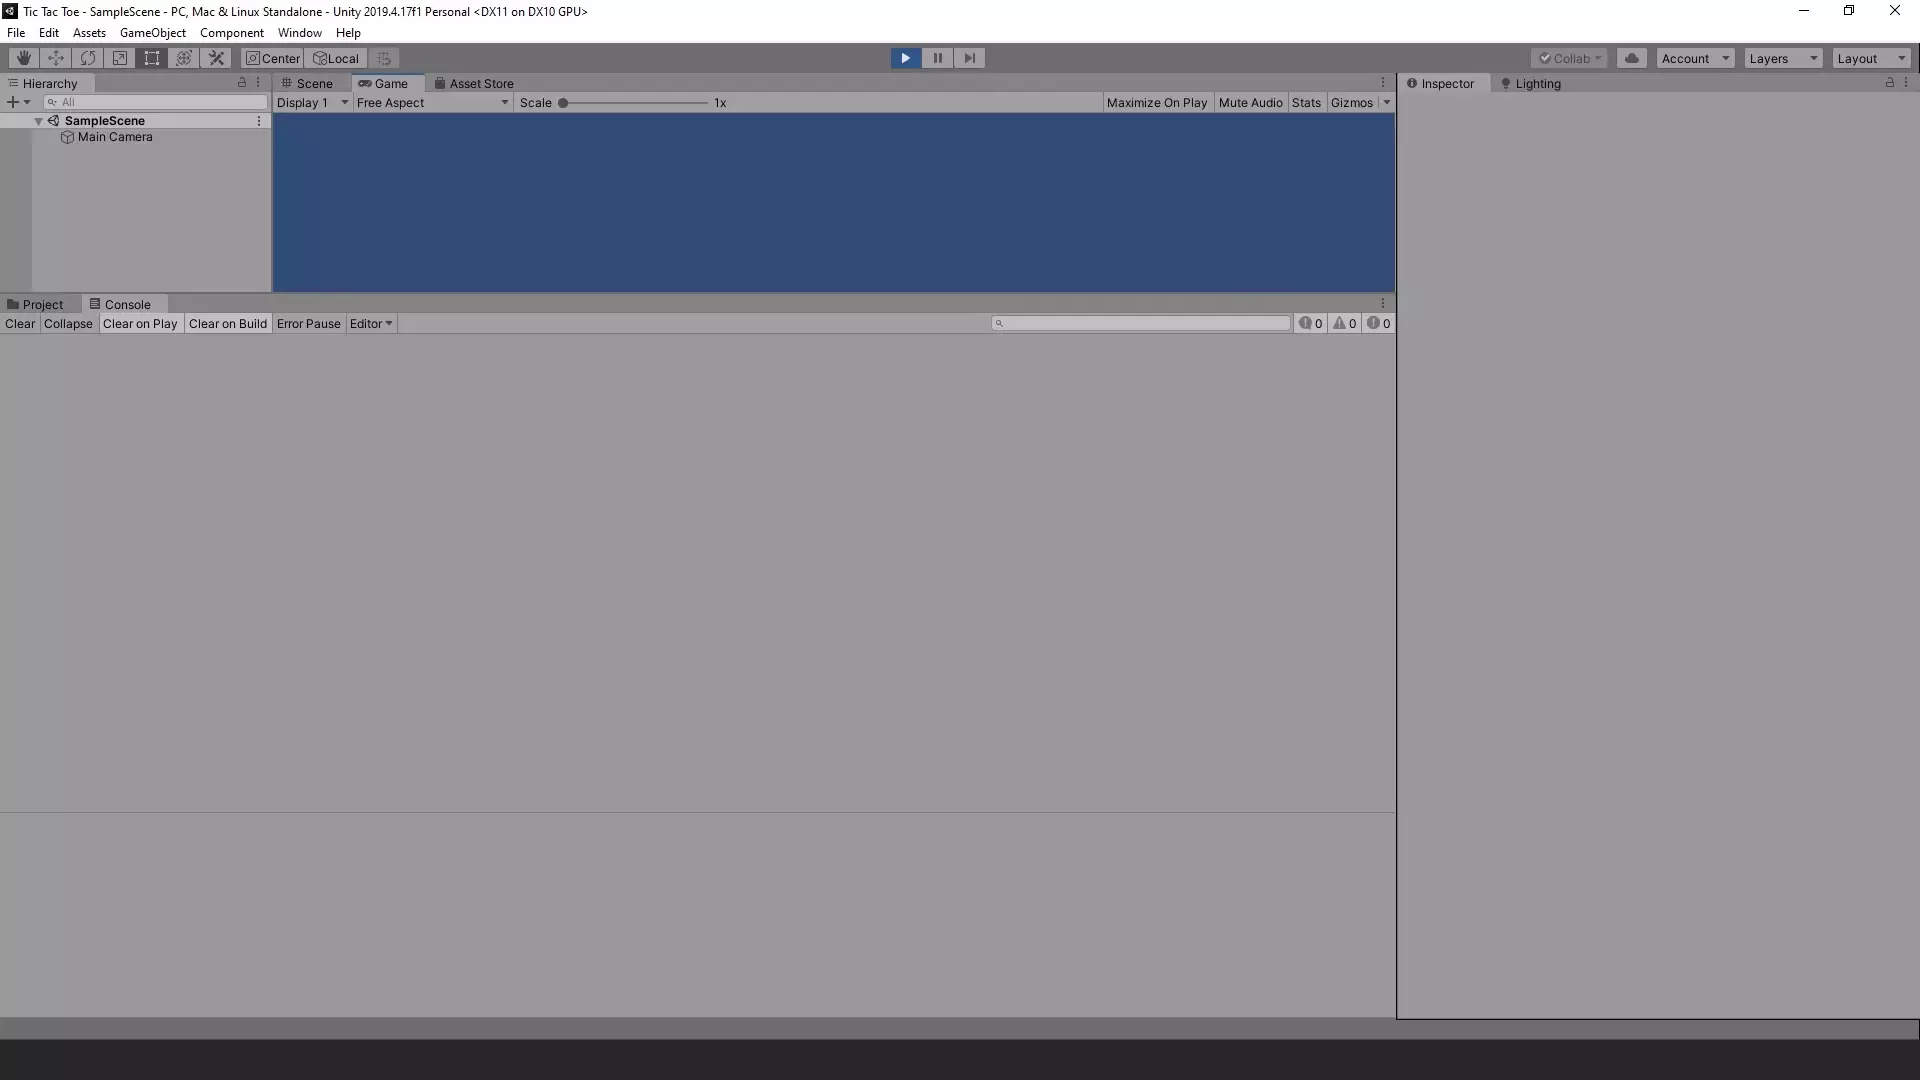
Now after we pressed play in Unity, no logs appeared inside the Console, as you can see in the image above.
This is because of the if condition, that’s stopping the code block inside it to be executed
until the Player is within the NPC’s range and is pressing X on Keyboard.
You will have to believe me when i say that i pressed the keys other than X and no logs appeared inside the Unity Console :p
If you are skeptical look at this video on Bite Sized Tech’s YouTube Channel ->
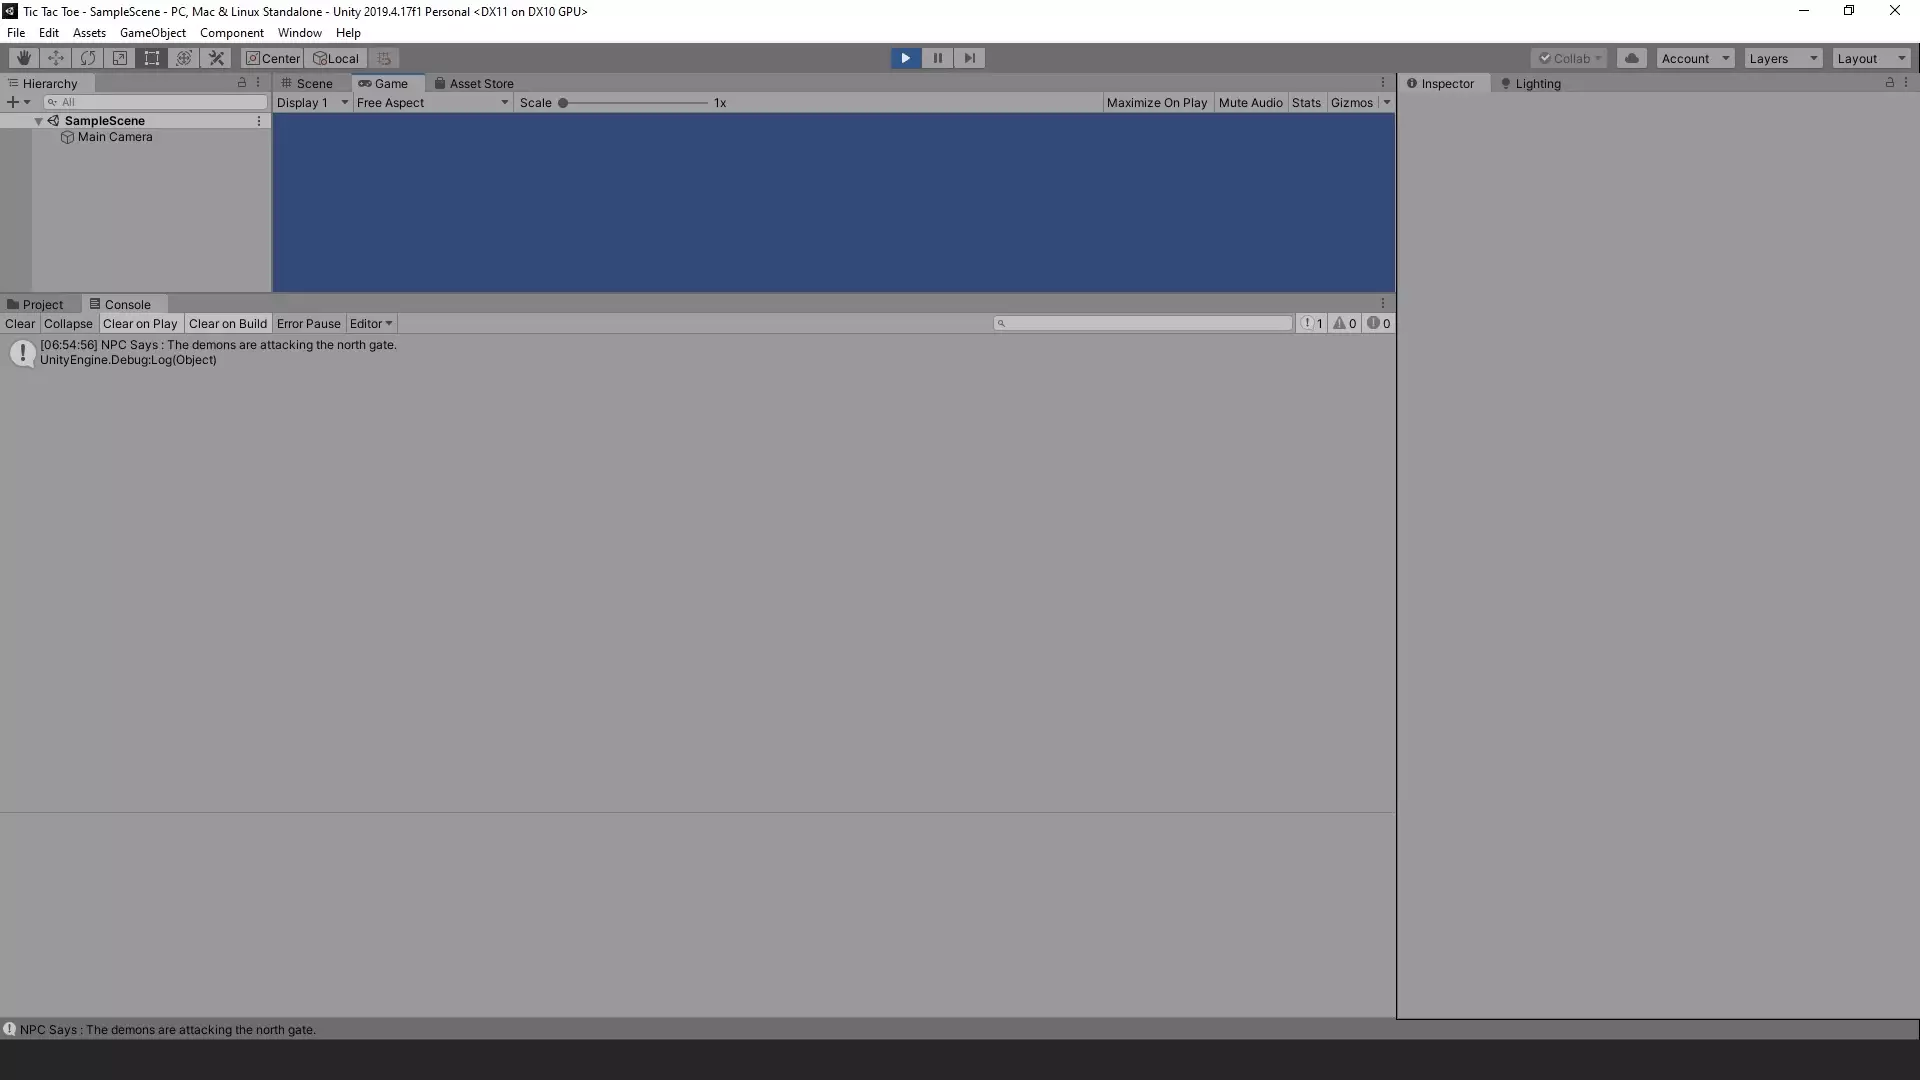
And if we pressed X, we get the log in the Unity Console saying
“NPC Says : The demons are attacking the north gate.”
as you can see below.
Defining a Method With Parameters in C# | Code Example | Unity Game Development Tutorial
Defining Necessary Variables, Methods and Parameters
Now with that done what we will do next is
create a scenario where the NPC will give different reply
based on if the Player trades an item for the information that the NPC has or not.
So now, let’s get this done
by first declaring a string variable named _tradedItem
but for now don’t set its value and let it be null.
After that, declare another method with the same name as the previous method i.e. startDialogue
but this time with a parameter inside the parenthesis.
The first startDialogue method that we have created does not take a parameter
while this new method will take an item name as parameter
to do this we have to type the data type of the parameter first
i.e. what sort of data type you will need to store the item name and in this case it is string
and then we will type the name of the variable this can anything that you want
but i’m naming it as itemName
and that it.
So, defining a parameter is you basically creating a variable that will be local to the method
and will allow you to pass some data inside the method
when you make a call to the Method.
Now Inside the method,
Debug.Log the Traded Item Name and the Information that the NPC provided, like this.
// Everything below is inside a Class.

private bool _withinRange = true;
private string _tradedItem;

void Update()
{
  if(Input.GetKeyDown(KeyCode.X) && _withinRange == true)
  {
    startDialogue();
  }
}

public void startDialogue()
{
  Debug.Log("NPC Says : The demons are attacking the north gate.");
}

public void startDialogue(string itemName)
{
  Debug.Log("NPC Says : Oh this seems to be " + itemName);
  Debug.Log("You seem to understand the rules of the street, huh? The north gate has already fallen and the demons will be attacking the old city centre soon.");
}
Modifying The Update Method To Check For Traded Item
Now inside the Update Method where we had called the Parameter-less startDialogue Method
let’s remove it and in it’s place create an if statement with the condition being
_tradedItem == null
and then an else if block with the condition being
_tradedItem != null
Now, inside the first block i.e. the if block
call the Parameter-less startDialogue Method
while inside else if block
call the startDialogue with the itemName Parameter
by passing _tradedItem variable as the Argument for the itemName Parameter
that we defined when creating this method.
and That’s it.
// Everything below is inside a Class.

private bool _withinRange = true;
private string _tradedItem;

void Update()
{
  if(Input.GetKeyDown(KeyCode.X) && _withinRange == true)
  {
    if(_tradedItem == null)
    {
      startDialogue();
    }
    else if(_tradedItem != null)
    {
      startDialogue(_tradedItem);
    }
  }
}

public void startDialogue()
{
  Debug.Log("NPC Says : The demons are attacking the north gate.");
}

public void startDialogue(string itemName)
{
  Debug.Log("NPC Says : Oh this seems to be " + itemName);
  Debug.Log("You seem to understand the rules of the street, huh? The north gate has already fallen and the demons will be attacking the old city centre soon.");
}
In this piece of code, multiple methods have the same name
and you can do this as long as the Number of the Parameters
and/or
the Data Type of Parameters are different.
In technical terms, this is what we call Method Overloading.
Now when we go to unity and execute this code
it should still execute the Parameter-less Method
as we have not set a value for _tradedItem.
So, let’s go to unity and check the logs.
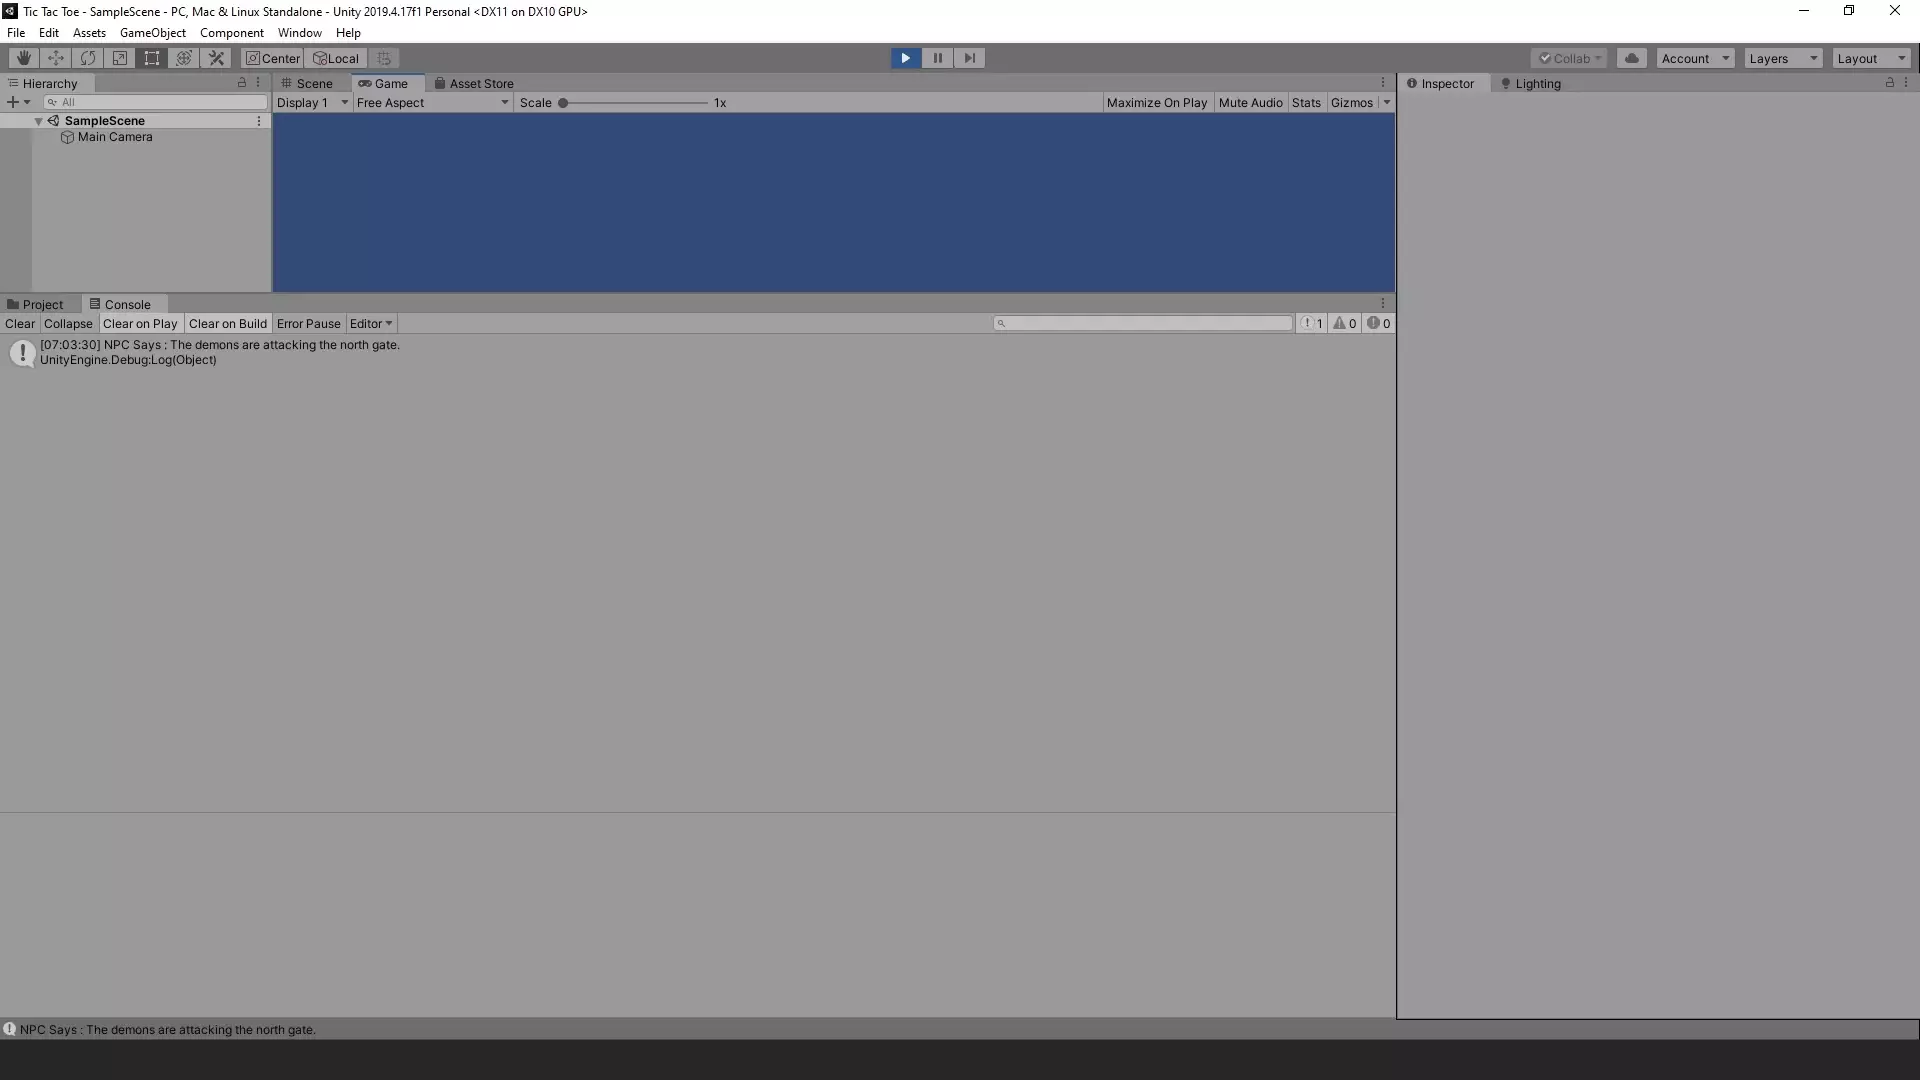
As you can see, it still printed the Debug.Log within the Parameter-less startDialogue Method
Now if we set the value for _tradedItem to Silver Spear like
private string _tradedItem = "Silver Spear";and go back to unity to check the logs
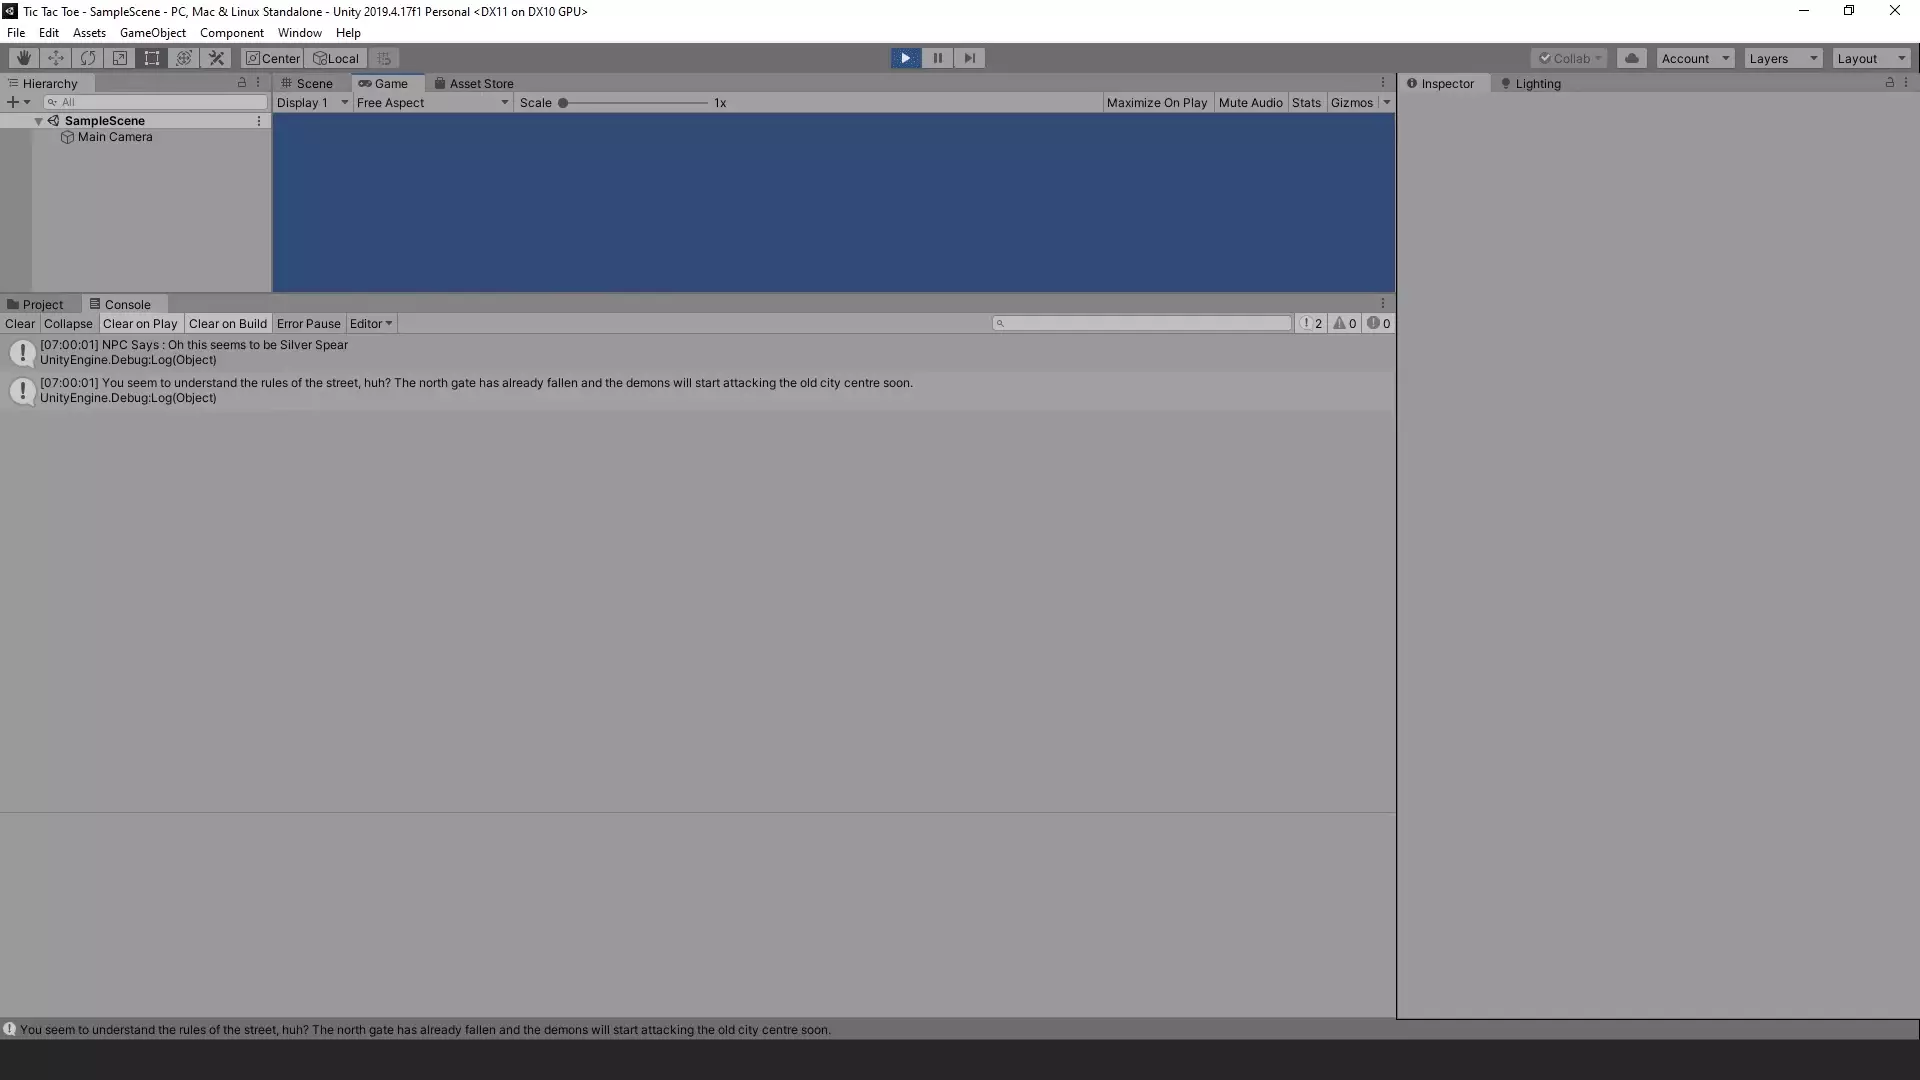
As you can see, it now shows the log inside the new method
and we can also see the argument i.e. Silver Spear
was passed correctly for the parameter itemName that we had defined for this method.
With that, i think i have covered most of the basic things regarding methods
Now there are still many more things that needs to be covered regarding methods
but as the article is already pretty long,
i will be covering those topics in the next articles and link them below.
List Of All Articles To Master Methods In C#
- Part 1 – Basics Of Methods <— Currently You Are Here! :p
- Part 2 – Multiple, Required and Optional Parameter + Named Arguments
- Part 3 – Overload Resolution
- Part 4 – In, Out and Ref Keywords
Conclusion
Well folks, that does it for this article.
i hope that this information will be helpful to you.
Share this post and follow us on Social Media platforms if you think our content is great, so that you never lose the source of something you love.
If you like the content do go through the various articles in How To Make A Game Series that this post is a part of and also go through the other series we have on Bite Sized Tech.
Also we have a YouTube Channel : Bite Sized Tech where we upload Informational Videos and Tutorials like this regularly. So, if you are interested do subscribe and go through our Uploads and Playlists.
Follow Us On Social Media
Goodbye for now,
This is your host VP
Signing off.
Articles In How To Make A Game Series
Game Development Softwares (Game Engines, 2D Art, 3D Art, Code Editor, DAW)
Methods | Part 1 – Basics of Methods
Methods | Part 2 – Multiple, Required & Optional Parameters + Named Arguments
Methods | Part 3 – Overload Resolution
Methods | Part 4 – In, Ref and Out Keywords
