There are various ways using which you can make conditional decisions in C# and Switch Statement is one of these ways of doing so.
In one of the precious articles i have already talked about how you can make decisions using if statements when coding
in this article we will take a look at how you can do the same using Switch statements.
So, let get started.
This Post is Part of : How To Make A Game Series where i’ll be showing you how to become a game developer and will be going over the basics of Game Development, Step by Step, using the Unity Game Engine and C# Scripting Language to script the Game Logic.
If you are new to Game Development or Programming in general you should definitely go through this Unity Tutorials article series as it will set give you a kick-start towards becoming an exceptional Unity 2D or 3D Video Game Developer.
If you are interested in how you can write a decision making statement using If Statements instead of Switch Statements,
then you might be interested in this article on If Statements in Unity and C#
in which i have explained in detail all the types of if statements, using real world RPG Scenarios
and code examples on how you can implement if Statement in your own Unity C# code.
What Is A Switch Statement?
Switch Statement just like the if Statement can be used to write a conditional block
that will result into different outputs based on the match expression or variable that is being switched.
For Example, suppose that you are designing a Star-ship in your game
and you want the A.I of your Star-ship to greet you and the various NPCs in your game with their individual names
when your or they enter the Start-ship’s command room.
Now this is the sort of scenario where you can use Switch Statement
to check who was the person that just entered the Command Room and then Greet them with their right name.
Understanding The Syntax Of A Switch Statement
// Everything below is just a placeholder code to understand syntax.
// For working example go further down in the article.

switch(match expression / variable)
{
  case constant-value:
    code block to be executed
    break;

  case default:
    code block to be executed
    break;
}
As you can see, the Syntax of the Switch Statement goes like this
First, similar to the if statement we have Switch and the Two Opening and Closing Parenthesis
that will tell the compiler that you are writing a Switch Statement.
Inside the Two Parenthesis we have the Match Expression or Variable whose value we are trying to Switch.
Next, inside the Curly Braces we have the Case and the Constant-Value.
You can consider the Constant Value as the value that you are trying to match
with the output of the Match Expression or the Data Stored inside the Variable that you are trying to switch.
Adding the Colon ( : ) after the constant-value is mandatory
and after that you can add the code block to executed if and when this case was met.
The case will be executed if the constant-value and the value of a match expression or variable are equal.
Now, When we are writing an if statement,
we use else if blocks to stack more conditions to be tested on top of each other
and else block to write the default statement
while when you are using the switch statement,
you keep on adding more cases
and use the default label to write the default statement.
Just like the else block in an if statement,
the default label will only be executed, if none of the case above it were executed.
And finally, as some of you might have noticed,
we need to use break and then Semicolon ( ; ) after each case to tell the compiler that this is the end of the case.
How To Write A Switch Statement In C#?
Now, let’s go to the RPG analogy and talk about another example on
how you might find Switch Statements helpful when developing a game.
Think about a Bar or a Cafe in your game and you having different Breakfast Menu every single day in this Bar or Cafe.
Now instead of just talking about this scenario, let’s write a switch statement step by step for it.
so let’s declare a string named _day
and then set Monday as it’s value.
and then in the Start() method
lets start writing the switch statement by typing
//Everything below is inside a Class.

private string _day = "Monday";

void Start()
{
  switch(_day)
  {

  }
}
and then inside the curly braces of Switch Statement
let’s write all the Cases, namely All the Days in a Week, by typing
//Everything below is inside a Class.

private string _day = "Monday";

void Start()
{
  switch(_day)
  {
    case "Monday":
    break;

    case "Tuesday":
    break;

    case "Wednesday":
    break;

    case "Thursday":
    break;

    case "Friday":
    break;

    case "Saturday":
    break;

    case "Sunday":
    break;

    case default:
    break;
  }
}
and then let’s Debug.Log the different breakfast item for each Day of the Week
and the log for the default label, like this
//Everything below is inside a Class.

private string _day = "Monday";

void Start()
{
  switch(_day)
  {
    case "Monday":
      Debug.Log("Omelette");
      break;

    case "Tuesday":
      Debug.Log("Hot Dog");
      break;

    case "Wednesday":
      Debug.Log("Toast");
      break;

    case "Thursday":
      Debug.Log("Hot Coffee");
      break;

    case "Friday":
      Debug.Log("Latte");
      break;

    case "Saturday":
      Debug.Log("Store is closed");
      break;

    case "Sunday":
      Debug.Log("Pizza Slice");
      break;

    case default:
      Debug.Log("Something went wrong");
      break;
  }
}
Breaking Down And Understanding The Code Block For Switch Statement
Now, let’s break down this piece of code to make sure that everyone understands how to write a Switch Statement.
First of all, we declared the variable to be switched that is _day and set it’s value to Monday.
Next we told the compiler that we are writing a Switch Statement and that _day is the variable that we want to switch.
After that, we wrote the various cases corresponding to the variable being switched
in this example of bar or cafe menu,
the variable to be switched was _day
so the cases corresponding to it were all the days in the week.
and of course we also wrote the default case which is like a safety net if something unexpected happened.
Next, we wrote what to do when a certain case is met and logged a breakfast item for each of the days of the week
and a log saying “Something Went Wrong” for the Default Case.
That’s it.
Now, Let’s execute this code block in Unity and check the logs in the Unity Console.
Executed Code | Simple Switch Statement | Unity C#
Unity Log | Simple Switch Statement | Unity C#
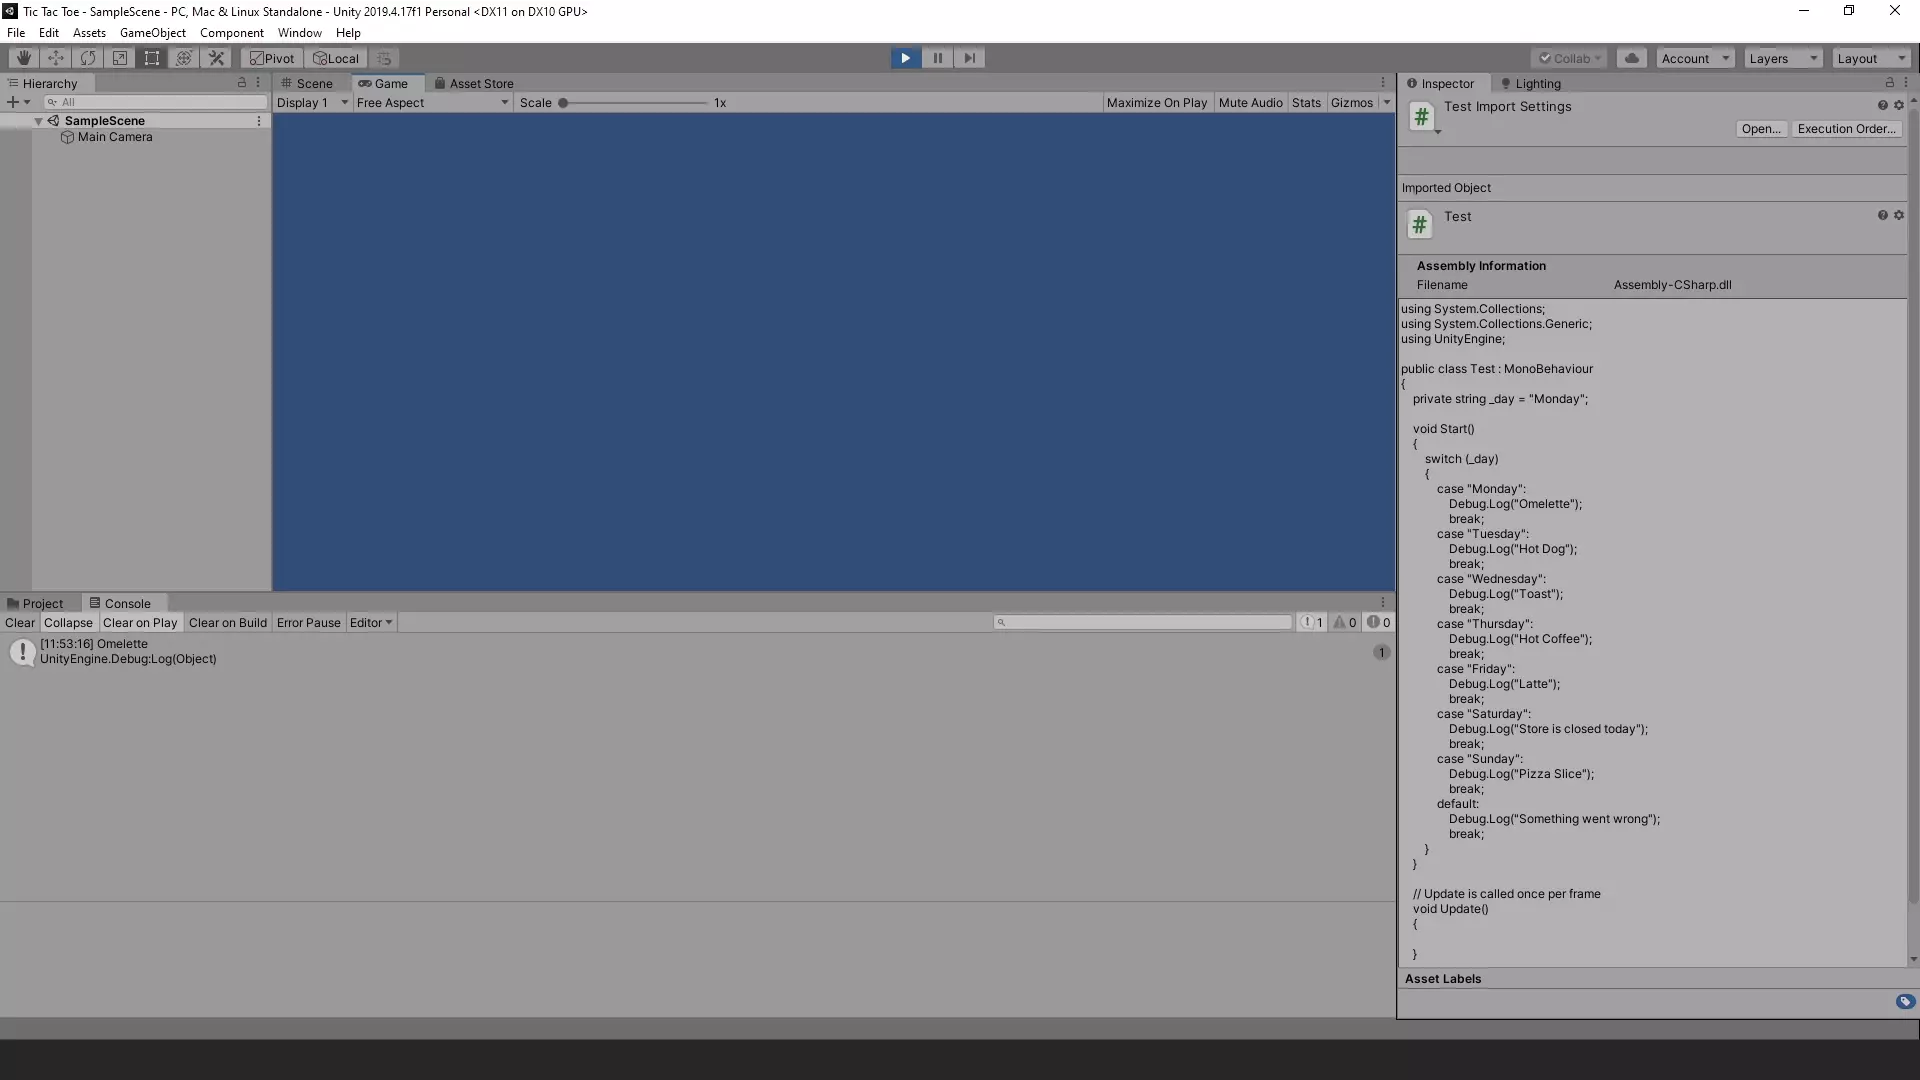
As you can see it says : “Omelette” which is the expected output.
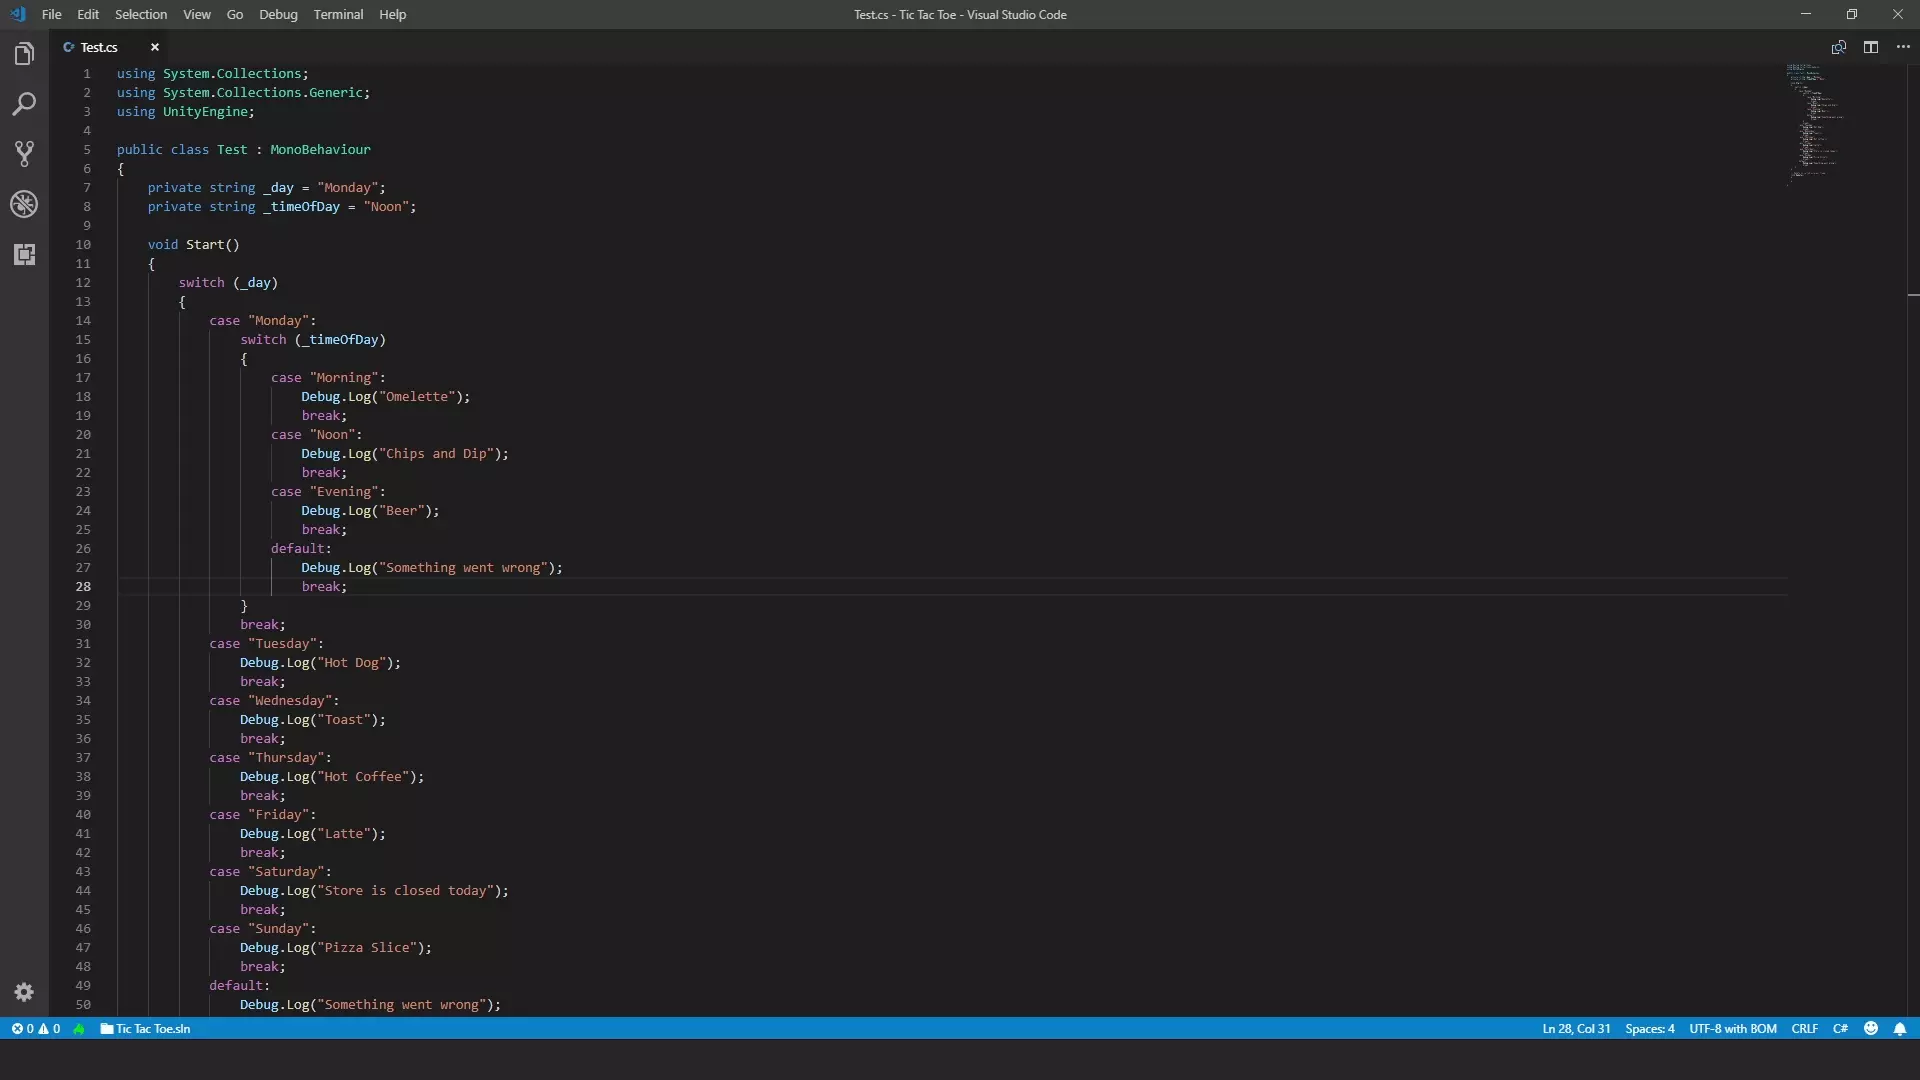
How To Write Nested Switch Statements in C#?
Back to the code,
Now, just like Nested If Statements,
you can also create Nested Switch Statements.
So let’s see how that works.
Going back to the RPG analogy.
Let’s say that, the Bar or Cafe has different items on the menu based on the Time of Day.
So to accomplish this,
let’s declare another variable named _timeOfDay and set it to Noon.
and then modify one of the cases where instead of directly logging the breakfast item
we will switch _timeOfDay like this
//Everything below is inside a Class.

private string _day = "Monday";
private string _timeOfDay = "Noon";

void Start()
{
  switch(_day)
  {
    case "Monday":
      switch(_timeOfDay)
      {
        case "Morning":
          Debug.Log("Omelette");
          break;

        case "Noon":
          Debug.Log("Chips and Dip");
          break;

        case "Evening":
          Debug.Log("Beer");
          break;

        case default:
          Debug.Log("Something Went Wrong");
          break;
      }
      break;

    case "Tuesday":
      Debug.Log("Hot Dog");
      break;

    case "Wednesday":
      Debug.Log("Toast");
      break;

    case "Thursday":
      Debug.Log("Hot Coffee");
      break;

    case "Friday":
      Debug.Log("Latte");
      break;

    case "Saturday":
      Debug.Log("Store is closed");
      break;

    case "Sunday":
      Debug.Log("Pizza Slice");
      break;

    case default:
      Debug.Log("Something went wrong");
      break;
  }
}
Make Sure that you don’t forget the break semicolon ( ; ) after the closing curly brace of the switch statement for the case Monday
as otherwise the switch statement won’t work.
That’s it with that we have coded a Nested Switch Statement.
Now Let’s execute this piece of code in Unity and check the logs in the console.
Executed Code | Nested Switch Statement | Unity C#
Unity Log | Nested Switch Statement | Unity C#
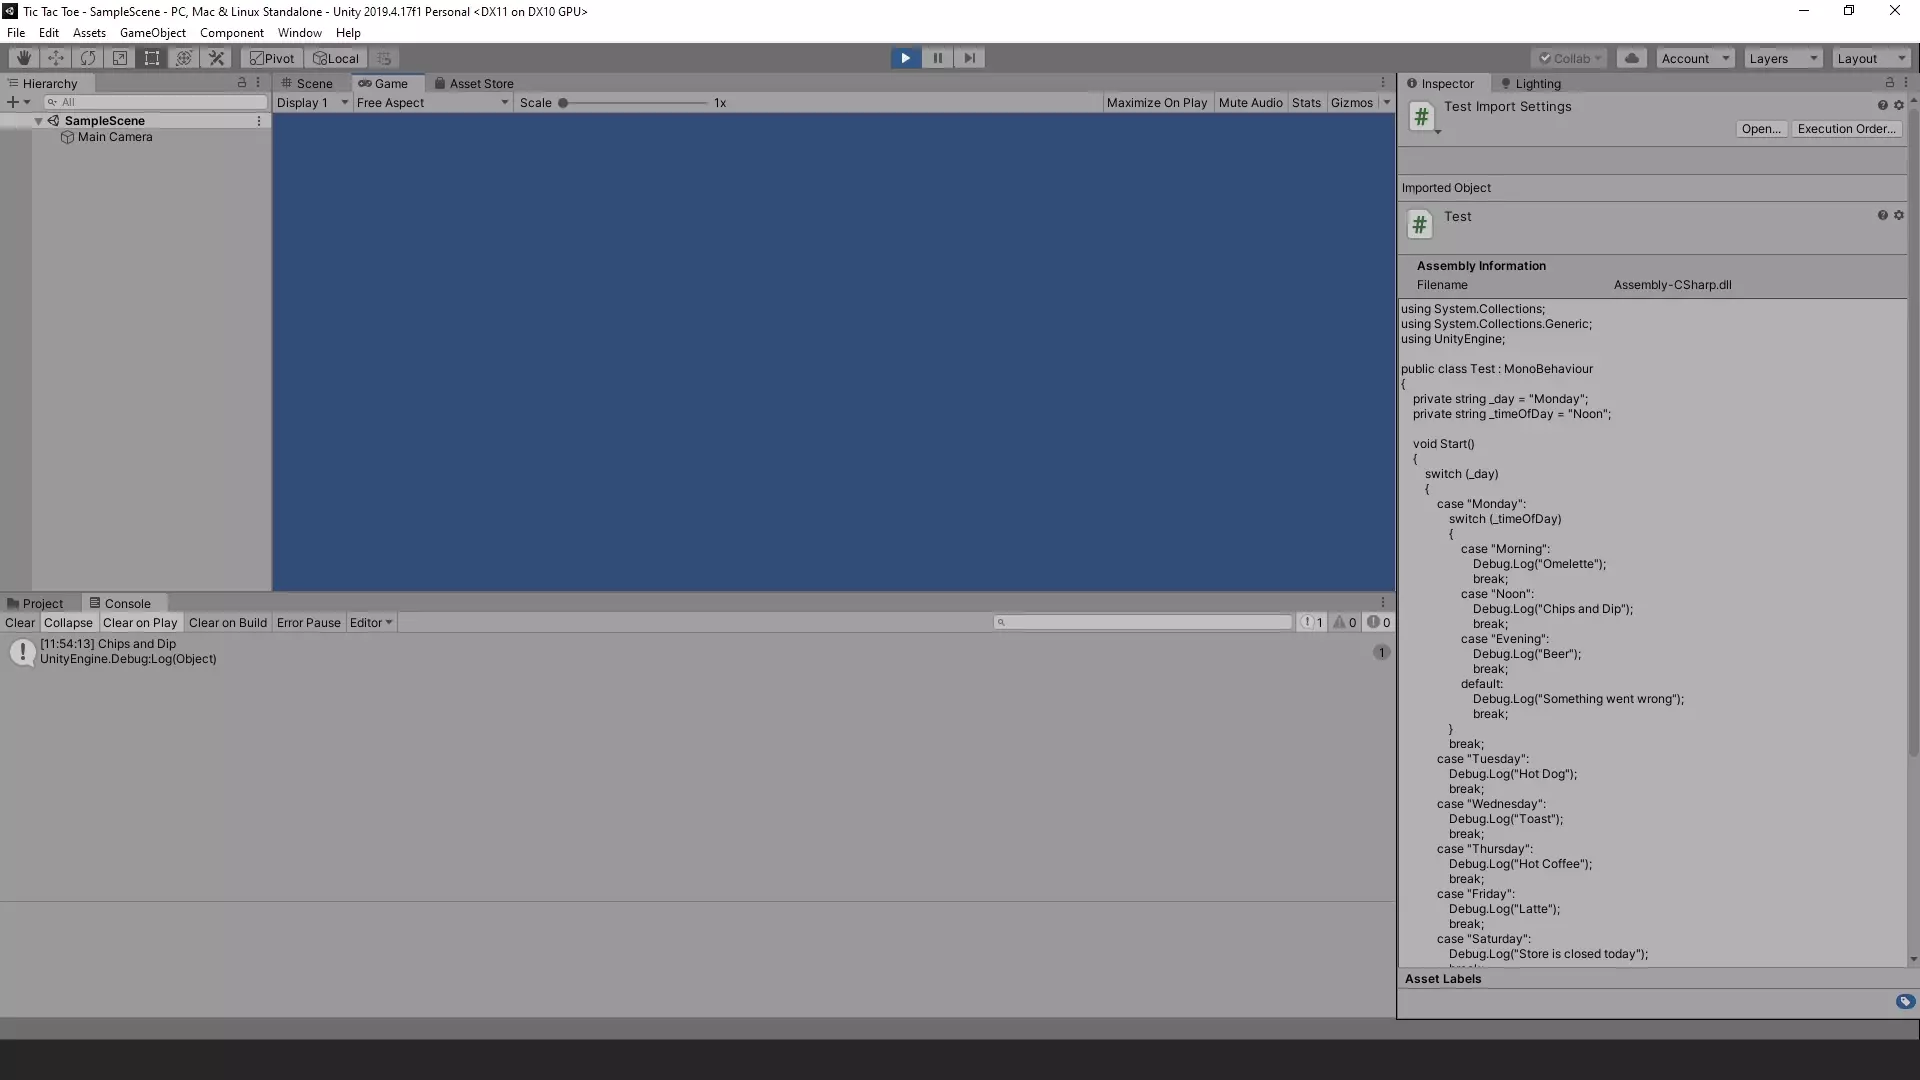
As you can see it says : “Chips and Dip” which is the expected output.
How To Combine Cases Of A Switch Statement in C#?
Back to the code, now you can also Combine Cases of a Switch Statement in C#
so that the same block of code will be executed, if the condition for the case is met.
Going back to the RPG analogy.
let’s say that, instead of having only one item available at a time of day,
you want to instead have all the items available throughout the day.
Although by doing this for our particular example, we will make the second switch statement pointless
but just to show how combined cases work, let’s move forth
To do so, instead of writing the code block and break semicolon ( ; ) after each case label
what you can do is,
you type the case label and code block to be executed like this instead
//Everything below is inside a Class.

private string _day = "Monday";
private string _timeOfDay = "Noon";

void Start()
{
  switch(_day)
  {
    case "Monday":
      switch(_timeOfDay)
      {
        case "Morning":
        case "Noon":
        case "Evening":
          Debug.Log("Omelette, Chips and Dip, Beer");
          break;

        case default:
          Debug.Log("Something Went Wrong");
          break;
      }
      break;

    case "Tuesday":
      Debug.Log("Hot Dog");
      break;

    case "Wednesday":
      Debug.Log("Toast");
      break;

    case "Thursday":
      Debug.Log("Hot Coffee");
      break;

    case "Friday":
      Debug.Log("Latte");
      break;

    case "Saturday":
      Debug.Log("Store is closed");
      break;

    case "Sunday":
      Debug.Log("Pizza Slice");
      break;

    case default:
      Debug.Log("Something went wrong");
      break;
  }
}
And that’s it.
Now whatever the time of day it is,
it will print the same log in the Unity Console i.e. “Omelette, Chips and Dip, Beer”.
Just to make sure that you understand,
you can choose to only join two of the cases if you want
and have a completely different block of code
to be executed for the third case like this
//Everything below is inside a Class.

private string _day = "Monday";
private string _timeOfDay = "Noon";

void Start()
{
  switch(_day)
  {
    case "Monday":
      switch(_timeOfDay)
      {
        case "Morning":
        case "Noon":
          Debug.Log("Omelette, Chips and Dip");
          break;

        case "Evening":
          Debug.Log("Beer");
          break;

        case default:
          Debug.Log("Something Went Wrong");
          break;
      }
      break;

    case "Tuesday":
      Debug.Log("Hot Dog");
      break;

    case "Wednesday":
      Debug.Log("Toast");
      break;

    case "Thursday":
      Debug.Log("Hot Coffee");
      break;

    case "Friday":
      Debug.Log("Latte");
      break;

    case "Saturday":
      Debug.Log("Store is closed");
      break;

    case "Sunday":
      Debug.Log("Pizza Slice");
      break;

    case default:
      Debug.Log("Something went wrong");
      break;
  }
}
but it would take more time to explain the scenario and make it more complex
so to maintain the simplicity of the example, i just went with joining all three cases here instead.
Conclusion
Well folks, that does it for this article.
i hope that this information will be helpful to you.
Share this post and follow us on Social Media platforms if you think our content is great, so that you never lose the source of something you love.
If you like the content do go through the various articles in How To Make A Game Series that this post is a part of and also go through the other series we have on Bite Sized Tech.
Also we have a YouTube Channel : Bite Sized Tech where we upload Informational Videos and Tutorials like this regularly. So, if you are interested do subscribe and go through our Uploads and Playlists.
Follow Us On Social Media
Goodbye for now,
This is your host VP
Signing off.
Articles In How To Make A Game Series
Game Development Softwares (Game Engines, 2D Art, 3D Art, Code Editor, DAW)
Methods | Part 1 – Basics of Methods
Methods | Part 2 – Multiple, Required & Optional Parameters + Named Arguments
Methods | Part 3 – Overload Resolution
Methods | Part 4 – In, Ref and Out Keywords